Mazda CX-5 Service & Repair Manual: D Pillar Reinforcement (Lower) Installation [Panel Replacement]
Symbol Mark

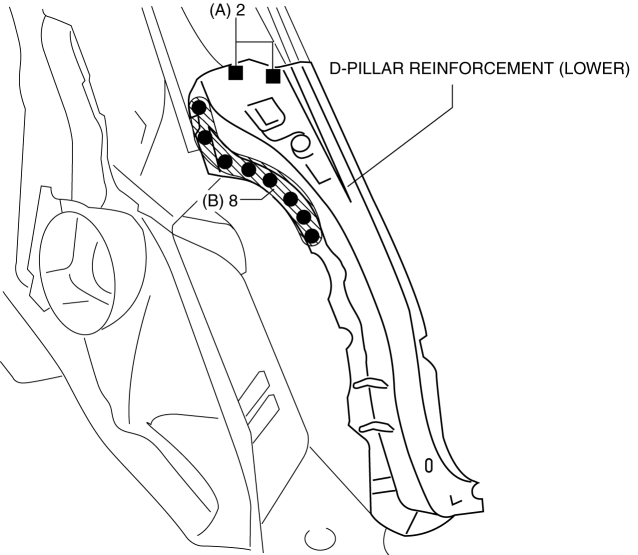
Installation Procedure
1. When installing new parts, measure and adjust the body as necessary to conform with standard dimensions.
2. Drill holes for the plug welding before installing the new parts.
3. After temporarily installing new parts, make sure the related parts fit properly.
4. Plug weld the 2 locations indicated by (A) shown in the figure.
5. Spot weld the 8 locations indicated by (B) shown in the figure, then install the D-pillar reinforcement (lower).
 Cowl Upper Plate Removal [Panel Replacement]
Symbol Mark
Removal Procedure
1. Drill the 9 locations indicated by (A) shown in the figure.
2. Drill the 2 locations by (B) from the front wheel housing side shown in the
figure.
3. Drill ...
 D Pillar Reinforcement (Lower) Removal [Panel Replacement]
Symbol Mark
Removal Procedure
1. Drill the 8 locations shown in the figure.
2. Remove the D-pillar reinforcement (lower). ...
Other materials:
Generator Removal/Installation [Skyactiv G 2.0]
WARNING:
Remove and install all parts when the engine is cold, otherwise they can
cause severe burns or serious injury.
When the battery cables are connected, touching the vehicle body with generator
terminal B will generate sparks. This can cause personal injury, fire, and ...
Speaker [With Bose®]
Purpose
Converts the audio signal from the audio unit to sound.
High quality sound is provided for the driver and passengers.
Function
Full-range speakers, which can output wide-range sound from low to high frequency,
have been adopted.
A better sound effect an ...
Airflow Mode Actuator Removal/Installation [Full Auto Air Conditioner]
1. Disconnect the negative battery cable..
2. Remove the following parts:
a. Dashboard under cover.
b. Glove compartment.
3. Disconnect the airflow mode actuator connector.
4. Remove the screw.
5. Remove the airflow mode actuator.
6. Remove the airflow mode main link.
7. Remo ...
