Mazda CX-5 Service & Repair Manual: Discharge Headlight Bulb
Purpose, Function
-
Charges the internal metallic element and emits white light resembling sunlight.
Construction
-
A mercury-free bulb has been adopted for the discharge headlight bulb.
-
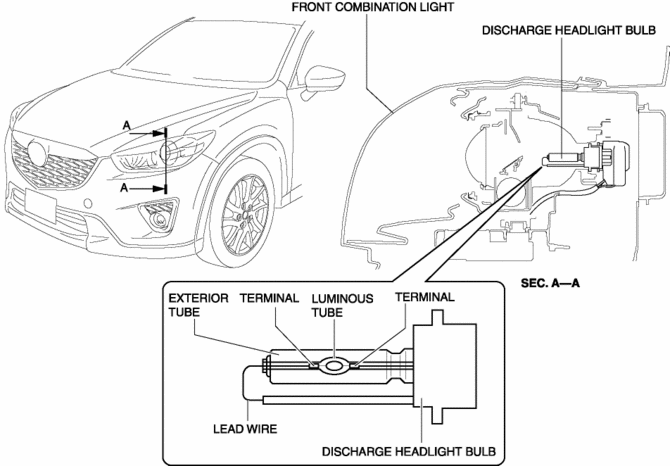
The discharge headlight bulb is assembled to the front combination light.
-
The discharge headlight bulb consists of xenon gas, a luminous tube in which metallic iodide is enclosed, a lead wire and electrodes which pass electricity, and an exterior tube.
Operation
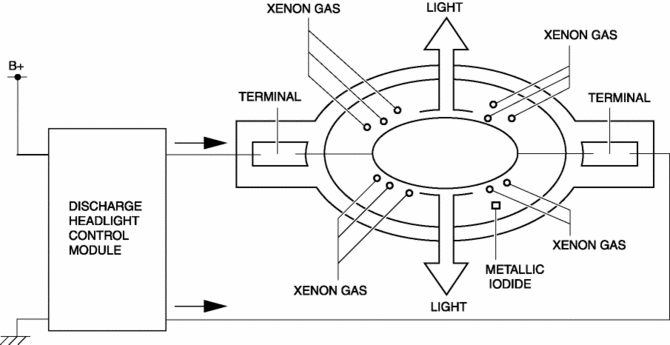
1. When high DC voltage (approx. 25,000 V) from the discharge headlight control module is input to the electrodes, the insulation between the electrodes is broken down and electrical current flows between the electrodes.
2. When electrical current flows between the electrodes of the discharge headlight bulb, the xenon gas is energized and emits light.
3. When the xenon gas emits light, temperature inside the discharge headlight bulb rises, the metallic iodide vaporizes/separates, and the metallic element discharges and emits light.
Fail-safe
-
Function not equipped.
 DRL (Daytime Running Light) System
Outline
The DRL system automatically switches the headlights to HI beams (50% dim)
or illuminates the DRL bulb when the ignition is switched ON (engine on), the
parking brake is released, ...
 Discharge Headlight Control Module
Purpose
Converts DC voltage from the battery to AC voltage and outputs the stabilized
voltage to the discharge headlight.
Function
The discharge headlight control module control ...
Other materials:
Eps Control Module Inspection
1. Remove the driver-side front scuff plate..
2. Remove the driver-side front side trim..
3. Remove the car-navigation unit (with car-navigation system)..
4. Remove the switch panel..
5. Remove the decoration panel..
6. Remove the shift lever knob (MTX vehicles)..
7. Remove the selector ...
Windshield Wiper Motor And Link Removal/Installation
1. Disconnect the negative battery cable..
2. Remove the following parts:
a. Windshield wiper arm and blade.
b. Cowl grille.
CAUTION:
Always affix protective tape to the windshield end. If the windshield wiper
motor and link contacts the windshield, it could damage the windshield. ...
Front Door Garnish Removal/Installation
WARNING:
Using a utility knife with bare hands can cause injury. Always wear gloves
when using a utility knife.
1. Using a tape-wrapped fastener remover, remove clips A in the direction of
arrow (1), (2) shown in the figure.
2. Remove the double-sided adhesive tape in the positi ...
