Mazda CX-5 Service & Repair Manual: Headliner Removal/Installation
1. Disconnect the negative battery cable..
2. Remove the following parts:
a. Sunroof seaming welt (with sunroof system).
b. A-pillar trim.
c. Front map light.
d. Sunvisor.
e. Front scuff plate.
f. Rear scuff plate.
g. B-pillar lower trim.
h. Adjust anchor cover.
i. Upper anchor installation bolt on the seat belt.
j. B-pillar upper trim.
k. Assist handle.
l. Trunk board.
m. Trunk end trim.
n. Trunk side trim.
o. D-pillar trim.
p. C-pillar trim.
3. Disconnect the roof wiring harness connector and remove the roof wiring harness connector clip from the body.
4. Disconnect the rear washer hose C. (with rear washer system).
5. Temporarily install the seaming welt shown in the figure to the headliner.
CAUTION:
-
If fasteners are removed without temporarily installing the seaming welt, the headliner may fall off and the part may be damaged. Before removing fasteners, temporarily install the seaming welt to prevent the headliner from falling off.
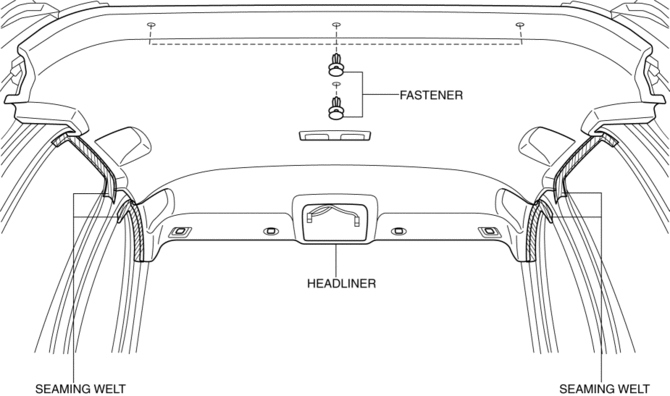
6. Remove fasteners.
7. Partially peel back the seaming welt. Take the headliner out from the opened liftgate.
8. Install in the reverse order of removal.
 Headliner
Purpose/Function
The headliner is equipped with a shock absorbing pad for driver's head protection
during a collision.
Construction
The front and rear side of the headliner ...
 Roof Molding Installation
1. Install the roof molding to the front T-studs.
2. Hook the roof molding to clips and attach the roof molding while pressing
it in the direction of the arrow shown in the figure.
3. Instal ...
Other materials:
Cruise Main Indicator Light (Amber)
Purpose/Function
Illuminates while the cruise control system is in standby mode to inform
the driver that the cruise control system is on standby.
Construction
Built into the instrument cluster.
Operation
Illuminates while the cruise control system is on sta ...
Windshield Wiper And Washer Switch Inspection
1. Disconnect the negative battery cable..
2. Remove the following parts:
a. Column cover.
b. Wiper and washer switch.
3. Use a tester to measure and verify that the continuity between the windshield
wiper and washer switch terminals is as indicated in the table.
If the continu ...
Hood Disassembly/Assembly
1. Disassemble in the order indicated in the table.
1
Fastener
2
Hood insulator
3
Shroud seaming welt
4
Weather strip parting seal
5
Hood component
...
