Mazda CX-5 Service & Repair Manual: Pre Tensioner Seat Belt [Two Step Deployment Control System]
Purpose
-
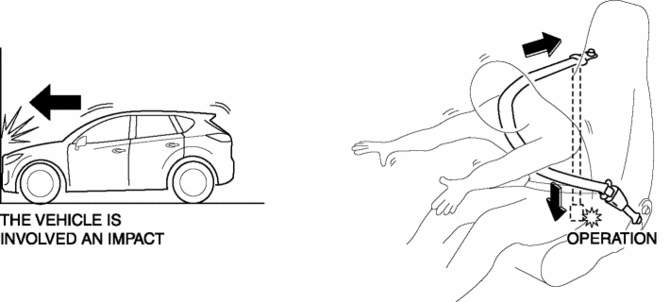
The pre-tensioner seat belt retracts and tightens the seat belt webbing to protect the front passengers during a collision.
Function
-
The pre-tensioner seat belts operate (deploy) based on the operation signal from the SAS control module to instantly retract and tighten the belt webbing, restraining the driver and front passenger.
Construction
-
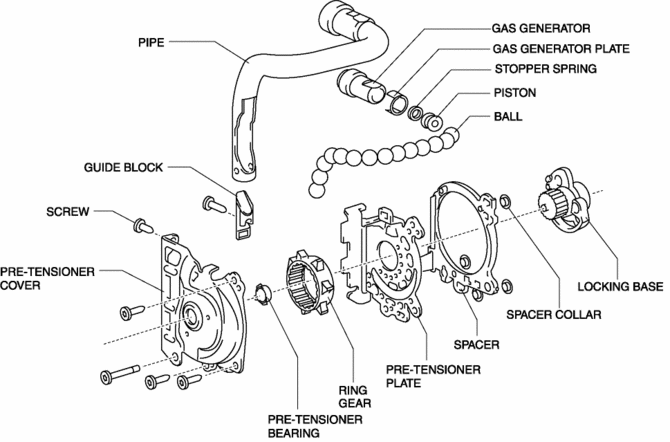
The pre-tensioner seat belt is installed to the front seat belt retractor.
-
The pre-tensioner seat belt consists of the following parts shown in the figure:
Operation
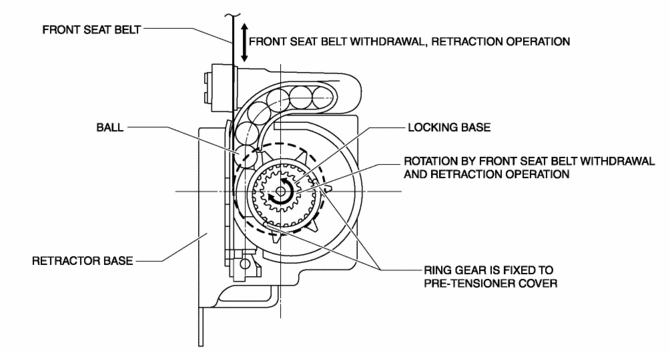
Normal operation (pre-tensioner non-operation)
-
Normally, there is a gap between the locking base and the ring gear.
-
The ring gear rotates in conjunction with the withdrawal and retraction of the front seat belts, however, in the pre-tensioner part it is kept separated.
Pre-tensioner activation
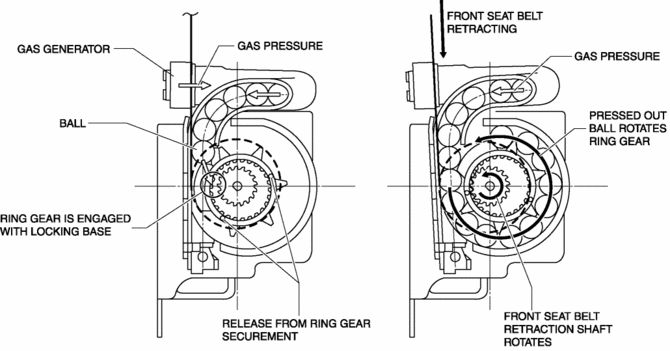
1. The gas generator produces gas when it receives an operation signal from the SAS control module.
2. The ball in the cylinder is pressed by the gas pressure and the ring gear is removed from its securement.
3. The ring gear is engaged with the locking base and the force of the ball being pressed out is transmitted to the retraction shaft.
4. The front seat belt is retracted in conjunction with the rotation of the retraction shaft.
Fail-safe
-
Function not equipped.
 Pre Tensioner Seat Belt [Standard Deployment Control System]
Purpose
The pre-tensioner seat belt retracts and tightens the seat belt webbing to
protect the front passengers during a collision.
Function
The pre-tensioner seat belts operate ...
 Rear Buckle Removal/Installation
1. Switch the ignition to off.
2. Disconnect the negative battery cable and wait for 1 min or more..
3. Press the release switch, then disconnect the rear center seat belt and rear
buckle.
...
Other materials:
Refrigerant System Service Cautions
Handling Insufficient Refrigerant Level
If an insufficient refrigerant level is detected at troubleshooting, do
not charge (add) the refrigerant. Because an accurate amount of refrigerant
cannot be determined from the pressure indicated on the manifold gauge, never
charge the refrige ...
Air Intake Actuator Inspection [Full Auto Air Conditioner]
1. Connect battery positive voltage to air intake actuator terminal B (or C),
connect terminal C (or B) to ground, and then verify that the air intake actuator
operates as shown in the table.
If the operation condition is not normal, replace the air intake actuator.
...
Automatic Transaxle Controls
Various Lockouts:
NOTE
The Sport AT has an option that is not included in the traditional automatic
transaxle giving the driver the option of selecting each gear instead of leaving
it to the transaxle to shift gears. Even if you intend to use the automatic transaxle
functions as a tradit ...
