Mazda CX-5 Service & Repair Manual: Rear Seat Cushion Removal/Installation
CAUTION:
-
When removing or putting in the rear seat cushion, contact with the surrounding areas of the vehicle could cause scratches and damage. When removing or putting in the rear seat cushion, always use two or more persons to perform the work and be careful not to scratch or damage the rear seat cushion and the surrounding area of the vehicle.
-
When performing the procedure with a rear seat cushion removed from the vehicle, perform the procedure on a clean cloth so as not to damage or soil the seat.
6:4 Split Type
1. Detach tabs A in the direction of the arrow (1) shown in the figure while lifting cover A in the direction of the arrow (2), detach hook B, and then remove cover A.
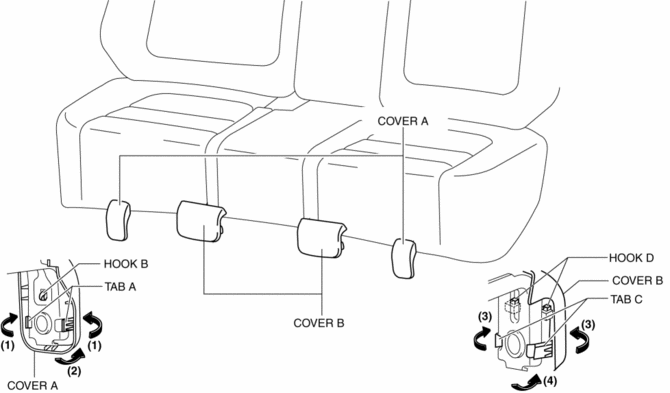
2. Detach tabs C in the direction of the arrow (3) shown in the figure while lifting cover B in the direction of the arrow (4), detach hook D, and then remove cover B.
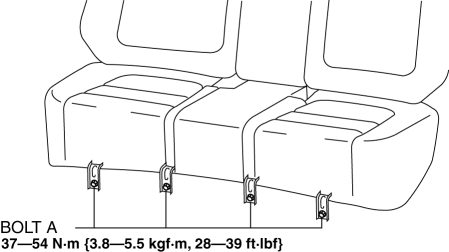
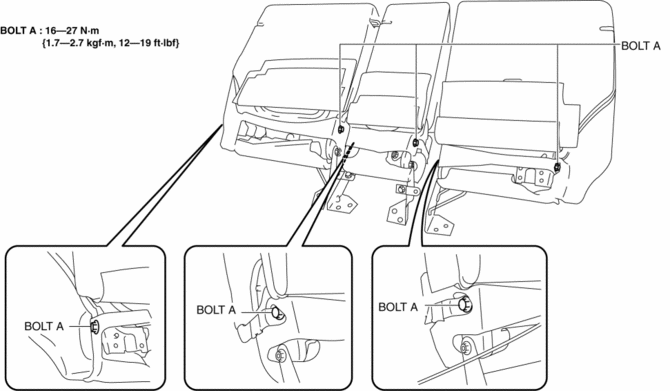
3. Remove bolts A.
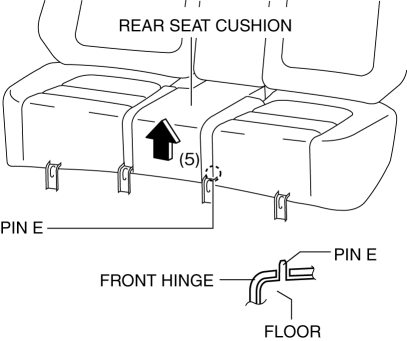
4. Lift up the rear seat cushion in the direction of the arrow (5) shown in the figure and set the pin E aside from the front hinge.
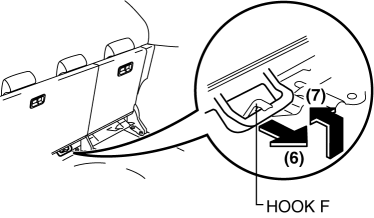
5. Move the rear seat cushion in the direction of the arrow (6), (7) shown in the figure and set the hook F aside.
6. Remove the rear seat cushion.
7. Install in the reverse order of removal.
WARNING:
-
If the hook and wire are not locked, the seat may move during a collision and the occupant may be injured. After installing the rear seat cushion, verify that the hook and wire are locked.
4:2:4 Split Type
1. Remove the trunk board..
2. Remove the rear seat..
3. Remove bolts A.
4. Remove the rear seat cushion.
5. Install in the reverse order of removal.
 Rear Seat Center Armrest Removal/Installation
1. Operate the push knob (RH) and lower the rear seat back (RH).
2. Remove screw A.
3. Remove the rear seat center armrest hinge cover (RH) in the direction of the
arrow (1) shown in the fig ...
 Rear Seat Cushion Trim Removal/Installation
CAUTION:
When removing or putting in the rear seat cushion, contact with the surrounding
areas of the vehicle could cause scratches and damage. When removing or putting
in the rear seat ...
Other materials:
Presilencer
Purpose, Function
Reduces the exhaust noise.
Construction
The presilencer is installed to the rear of the TWC.
2WD
AWD
The presilencer consists of the filters, stuffing and wool-stainless.
2WD
AWD
...
Variable Valve Timing Mechanism
Outline
Achieves optimum valve timing according to the driving conditions by the
variable valve timing mechanism changing the phases of the camshaft.
An electric type variable valve timing mechanism on the intake side and a
hydraulic pressure type on the exhaust side has been ad ...
Rear Brake (Disc) Removal/Installation
1. Loosen the adjusting nut..
2. Remove in the order indicated in the table.
3. Install in the reverse order of removal.
4. After installation, add brake fluid, bleed the air, and inspect for fluid
leakage..
5. Pump the brake pedal a few times and inspect the following:
The disc pa ...
