Mazda CX-5 Service & Repair Manual: Side Sill Panel Removal [Panel Replacement]
Symbol Mark

Removal Procedure
Side sill (front side)
1. Rough cut the 2 locations indicated by (A) shown in the figure.
2. Drill the 18 locations indicated by (B) shown in the figure.
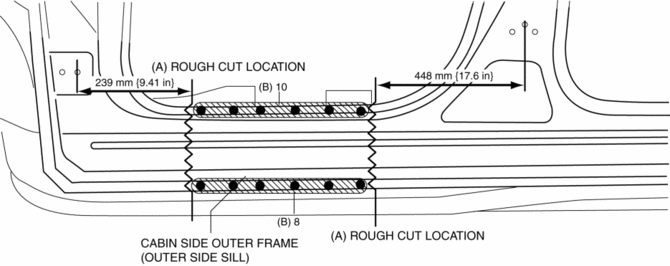
3. Remove the cabin side outer frame (outer side sill).
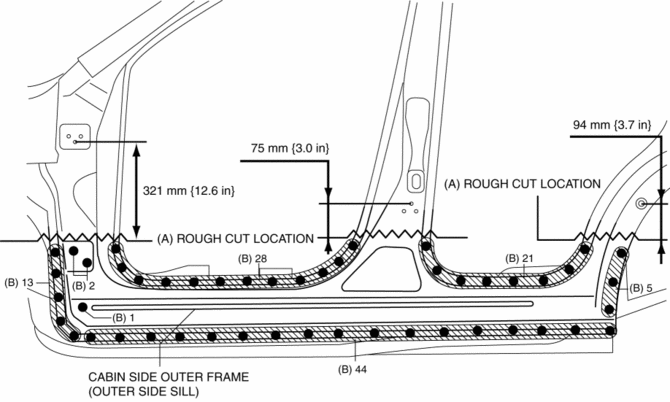
Side sill (component)
1. Rough cut the 3 locations indicated by (A) shown in the figure.
2. Drill the 114 locations indicated by (B) shown in the figure, then remove the cabin side outer frame (outer side sill).
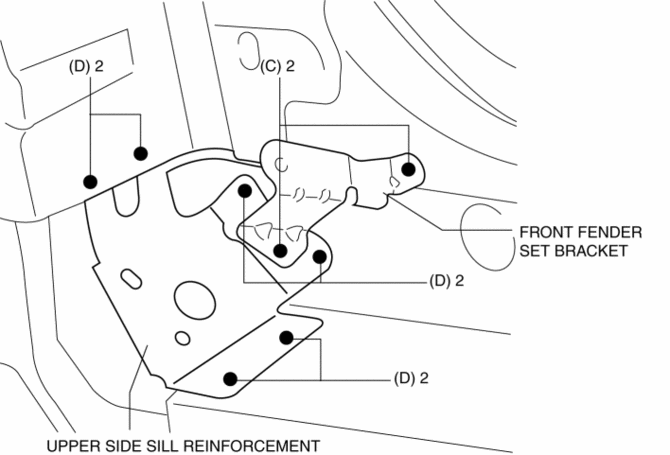
3. Drill the 2 locations indicated by (C) shown in the figure, then remove the front fender set bracket.
4. Drill the 6 locations indicated by (D) shown in the figure, then remove the upper side sill reinforcement.
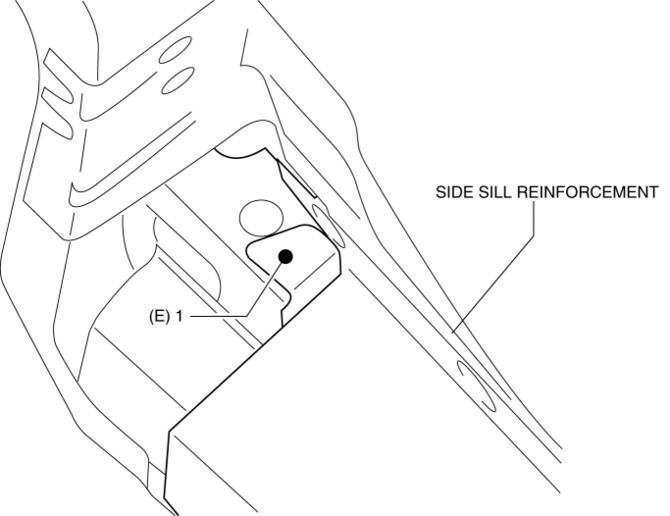
5. Drill the 1 location indicated by (E) shown in the figure.
6. Drill the 35 locations indicated by (F) shown in the figure.

7. Pull the side sill reinforcement from the inner side sill, hinge reinforcement and center pillar reinforcement, and then remove it.
 Side Sill Panel Installation [Panel Replacement]
Symbol Mark
Installation Procedure
Side sill (front side)
1. When installing new parts, measure and adjust the body as necessary to conform
with standard dimensions.
2. Drill holes for the ...
 Side Step Molding Removal/Installation
1. Set the rear over fender aside..
2. Insert a tape-wrapped flathead screwdriver shown in the figure and remove
the clip A in the direction of arrow (1).
3. Slide the side step molding in t ...
Other materials:
Pressure Sensor [Two Step Deployment Control System]
Purpose
The pressure sensor determines at an earlier stage whether to detonate the
air bag on the side of the vehicle (around front door) receiving an impact.
This is for improved accuracy of the side air bag operation (deployment).
Function
When the vehicle is involved in ...
Clock Spring Adjustment [Two Step Deployment Control System]
1. Set the front wheels straight ahead.
CAUTION:
The clock spring will break if over?wound. Do not forcibly turn the clock
spring.
2. Turn the clock spring clockwise until it stops.
3. Turn the clock spring counterclockwise approx. 2 turns.
4. Align the mark on the clo ...
Power Window Motor Removal/Installation
Front Power Window Motor
1. Fully lower the front door glass.
2. Disconnect the negative battery cable..
3. Remove the inner garnish..
4. Remove the front door trim..
5. Disconnect the front power window motor connector.
6. Remove bolt A.
7. Remove bolt B.
8. Remove bolt C.
9. R ...
