Mazda CX-5 Service & Repair Manual: Front Door Speaker Removal/Installation
Without Bose®
NOTE:
-
If the procedure is performed while holding the front door speaker cone, it could deform the cone causing a malfunction. Therefore, perform the procedure while holding any part other than the cone.
1. Disconnect the negative battery cable..
2. Remove the following parts:
a. Inner garnish.
b. Front door trim.
3. Disconnect the connector.
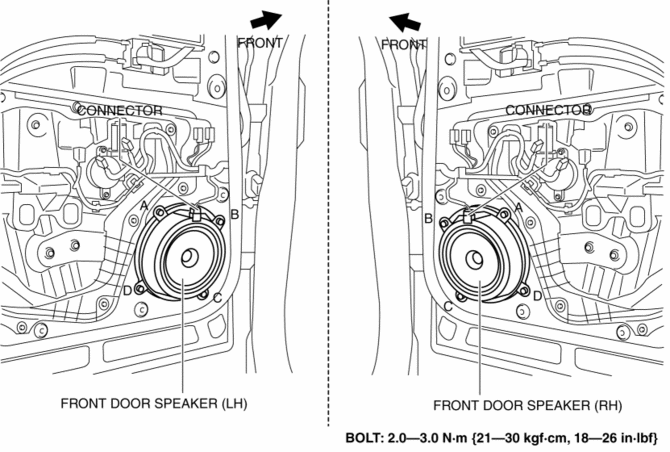
4. Remove the bolts in alphabetical order.
5. Pull the front door speaker in the direction of the arrow shown in the figure and remove it while detaching the pins.

6. Install in the reverse order of removal.
With Bose®
1. Disconnect the negative battery cable..
2. Remove the following parts:
a. Inner garnish.
b. Front door trim.
3. Disconnect the connector.

4. Remove the bolts in alphabetical order.
5. Pull the front door speaker in the direction of the arrow shown in the figure and remove it while detaching the pins.

6. Remove the screws.

7. Remove the front door speaker from the bracket.
8. Install in the reverse order of removal.
 Front Door Speaker Inspection
1. Disconnect the negative battery cable..
2. Remove the following parts:
a. Inner garnish.
b. Front door trim.
3. Disconnect the front door speaker connector..
4. Verify that the resistance ...
 Glass Antenna
Purpose, Function
The RDS (Radio Data System) converts radio broadcast waves to electric signals
and sends the signals to the audio unit.
Construction
An antenna with excellent ...
Other materials:
Disc Pad (Rear) Replacement
1. Remove in the order indicated in the table.
2. Install in the reverse order of removal.
3. After installation, pump the brake pedal a few times and inspect the following:
The disc pad projection is securely installed to the piston groove
Parking brake lever stroke
Bra ...
Washer Tank Removal/Installation
With Washer Fluid-level Sensor
1. Disconnect the negative battery cable..
2. Set the front over fender aside..
3. Set the mudguard (RH) aside..
4. Remove the front bumper..
5. Remove the bracket.
6. Disconnect the washer motor connector.
7. Disconnect the washer fluid-level sensor c ...
Front Lower Arm Removal/Installation
1. Remove the front under cover No.2..
2. Remove in the order indicated in the table.
3. Install in the reverse order of removal.
4. Inspect the wheel alignment and adjust it if necessary..
1
Front lower arm ball joint
2
Front lower arm ...
