Mazda CX-5 Service & Repair Manual: Headliner Removal/Installation
1. Disconnect the negative battery cable..
2. Remove the following parts:
a. Sunroof seaming welt (with sunroof system).
b. A-pillar trim.
c. Front map light.
d. Sunvisor.
e. Front scuff plate.
f. Rear scuff plate.
g. B-pillar lower trim.
h. Adjust anchor cover.
i. Upper anchor installation bolt on the seat belt.
j. B-pillar upper trim.
k. Assist handle.
l. Trunk board.
m. Trunk end trim.
n. Trunk side trim.
o. D-pillar trim.
p. C-pillar trim.
3. Disconnect the roof wiring harness connector and remove the roof wiring harness connector clip from the body.
4. Disconnect the rear washer hose C. (with rear washer system).
5. Temporarily install the seaming welt shown in the figure to the headliner.
CAUTION:
-
If fasteners are removed without temporarily installing the seaming welt, the headliner may fall off and the part may be damaged. Before removing fasteners, temporarily install the seaming welt to prevent the headliner from falling off.
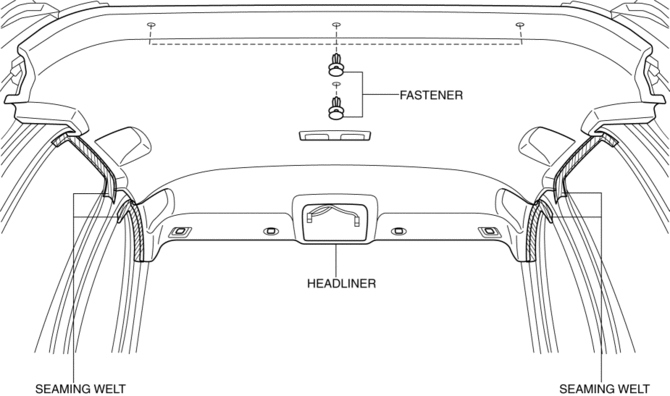
6. Remove fasteners.
7. Partially peel back the seaming welt. Take the headliner out from the opened liftgate.
8. Install in the reverse order of removal.
 Headliner
Purpose/Function
The headliner is equipped with a shock absorbing pad for driver's head protection
during a collision.
Construction
The front and rear side of the headliner ...
 Roof Molding Installation
1. Install the roof molding to the front T-studs.
2. Hook the roof molding to clips and attach the roof molding while pressing
it in the direction of the arrow shown in the figure.
3. Instal ...
Other materials:
Rear Door Latch And Lock Actuator Inspection
The following actuator and switch are integrated with the rear door latch
and lock actuator.
From the actuator/switch name and operation in the following table, select
the actuator or switch to be inspected, and perform the inspection following
the inspection procedure des ...
Variable Valve Timing Mechanism
Outline
Achieves optimum valve timing according to the driving conditions by the
variable valve timing mechanism changing the phases of the camshaft.
An electric type variable valve timing mechanism on the intake side and a
hydraulic pressure type on the exhaust side has been ad ...
Headlight Aiming
NOTE:
Perform headlight aiming if any of the following work is performed.
Front combination light replacement
Work that can affect vehicle height such as suspension replacement or
removal/installation.
1. Empty the vehicle by having all occupants leav ...
