Mazda CX-5 Service & Repair Manual: Keyless Antenna Removal/Installation
With Advanced Keyless Entry System
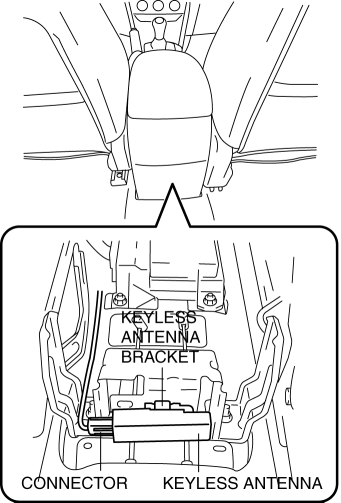
Vehicle interior, front
1. Disconnect the negative battery cable..
2. Remove the following parts:
a. Decoration panel.
b. Shift lever knob (MTX).
c. Front console box.
d. Shift panel.
e. Upper panel.
f. Rear console.
g. Side wall.
h. Front console.
3. Disconnect the connector from the keyless antenna.
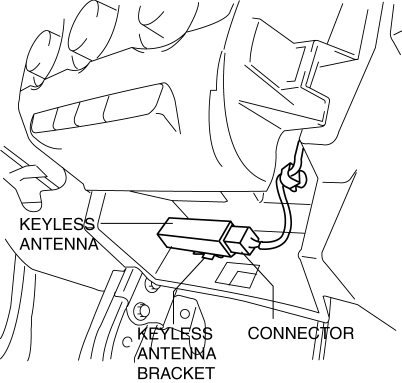
CAUTION:
-
Disconnect the connector while holding the keyless antenna, otherwise the keyless antenna bracket could be damaged.
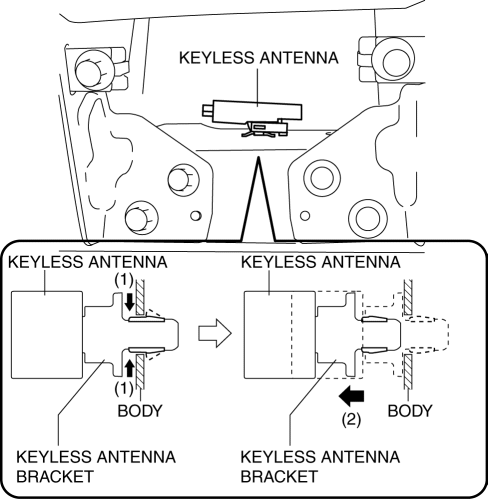
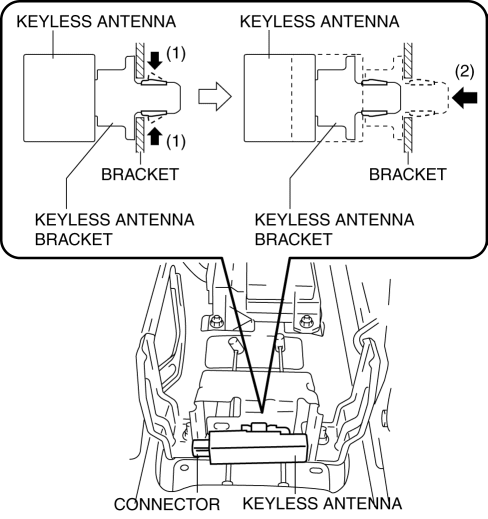
4. While pressing the keyless antenna bracket tab in the direction of arrow (1) shown in the figure, press it in the direction of arrow (2) to detach the keyless antenna bracket tab from the instrument panel.
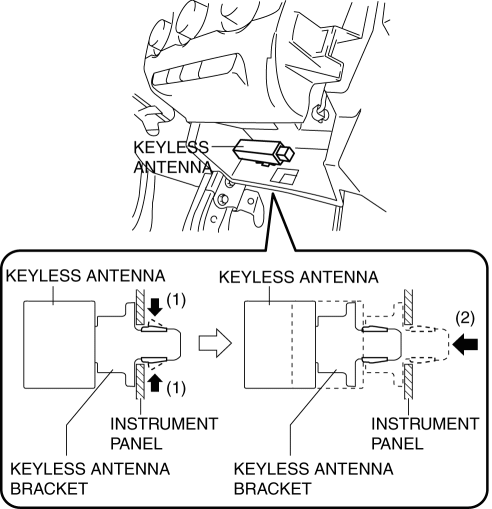
5. Remove the keyless antenna from the instrument panel.
6. Insert a tape-wrapped flathead screwdriver into the position shown in the figure.
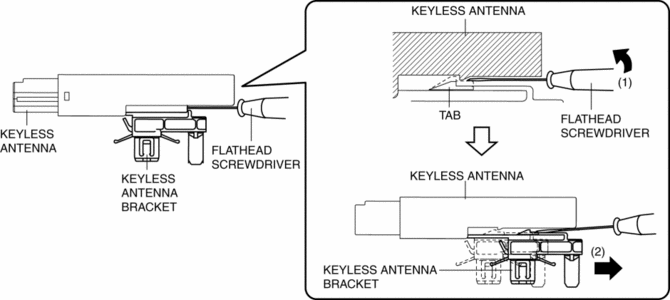
7. Move the tape-wrapped flathead screwdriver in the direction of arrow (1) shown in the figure to press the keyless antenna bracket tab, and pull it in the direction of arrow (2) to detach the keyless antenna bracket from the keyless antenna.
8. Remove the keyless antenna bracket from the keyless antenna.
9. Install in the reverse order of removal.
Vehicle interior, rear
1. Disconnect the negative battery cable..
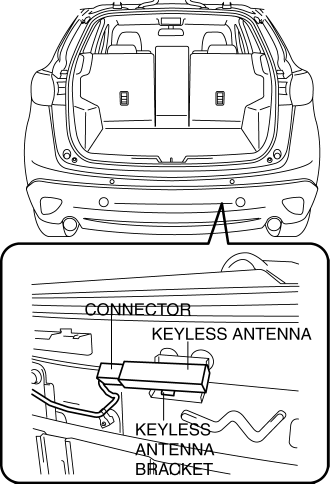
2. Remove the trunk board..
3. Disconnect the connector from the keyless antenna.
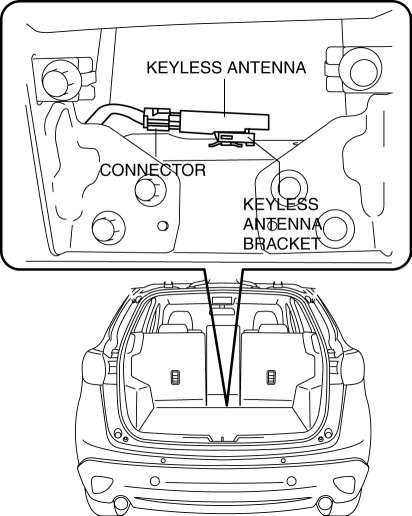
CAUTION:
-
Disconnect the connector while holding the keyless antenna, otherwise the keyless antenna bracket could be damaged.
4. While pressing the keyless antenna bracket tab in the direction of arrow (1) shown in the figure, press it in the direction of arrow (2) to detach the keyless antenna bracket tab from the body.
5. Remove the keyless antenna from the body.
6. Insert a tape-wrapped flathead screwdriver into the position shown in the figure.
7. Move the tape-wrapped flathead screwdriver in the direction of arrow (1) shown in the figure to press the keyless antenna bracket tab, and pull it in the direction of arrow (2) to detach the keyless antenna bracket from the keyless antenna.
8. Remove the keyless antenna bracket from the keyless antenna.
9. Install in the reverse order of removal.
Vehicle exterior, rear
1. Disconnect the negative battery cable..
2. Disconnect the connector from the keyless antenna.
CAUTION:
-
Disconnect the connector while holding the keyless antenna, otherwise the keyless antenna bracket could be damaged.
3. While pressing the keyless antenna bracket tab in the direction of arrow (1) shown in the figure, press it in the direction of arrow (2) to detach the keyless antenna bracket tab from the bracket.
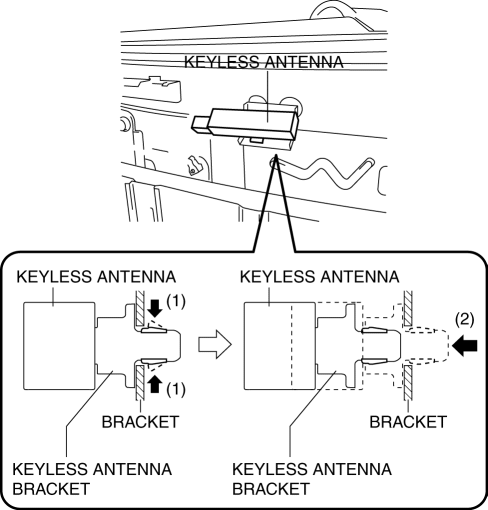
4. Remove the keyless antenna from the bracket.
5. Insert a tape-wrapped flathead screwdriver into the position shown in the figure.
6. Move the tape-wrapped flathead screwdriver in the direction of arrow (1) shown in the figure to press the keyless antenna bracket tab, and pull it in the direction of arrow (2) to detach the keyless antenna bracket from the keyless antenna.
7. Remove the keyless antenna bracket from the keyless antenna.
8. Install in the reverse order of removal.
Vehicle exterior, driver's side/passenger's side
NOTE:
-
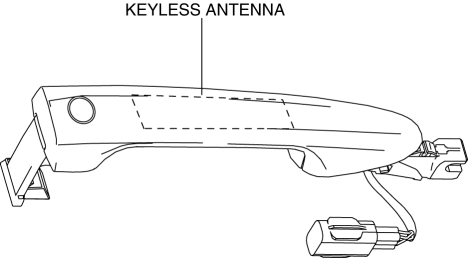
The keyless antenna (vehicle exterior, driver's side/passenger's side) cannot be removed as a single unit because it is built into the front outer handle. To replace the keyless antenna (vehicle exterior, driver's side/passenger's side), replace the front outer handle..
With Keyless Entry System
Vehicle interior, center
1. Disconnect the negative battery cable..
2. Remove the following parts:
a. Decoration panel.
b. Shift lever knob (MTX).
c. Front console box.
d. Shift panel.
e. Upper panel.
f. Rear console.
3. Disconnect the connector from the keyless antenna.
CAUTION:
-
Disconnect the connector while holding the keyless antenna, otherwise the keyless antenna bracket could be damaged.
4. While pressing the keyless antenna bracket tab in the direction of arrow (1) shown in the figure, press it in the direction of arrow (2) to detach the keyless antenna bracket tab from the bracket.
5. Remove the keyless antenna from the bracket.
6. Insert a tape-wrapped flathead screwdriver into the position shown in the figure.
7. Move the tape-wrapped flathead screwdriver in the direction of arrow (1) shown in the figure to press the keyless antenna bracket tab, and pull it in the direction of arrow (2) to detach the keyless antenna bracket from the keyless antenna.
8. Remove the keyless antenna bracket from the keyless antenna.
9. Install in the reverse order of removal.
 Entry System
...
 Keyless Antenna [Advanced Keyless Entry System]
Purpose
Outputs a request signal and specifies the remote transmitter location.
Function
The keyless antenna outputs request signals to the inside and outside of
the vehicle bas ...
Other materials:
Not P Position Switch Inspection
NOTE:
The not P position switch is built into the selector lever component.
1. Disconnect the negative battery cable..
2. Remove the front console..
3. Disconnect the selector lever component connector.
4. Verify that the continuity between selector lever component terminals ...
Door Adjustment
1. Measure the gap and height difference between the door and the body.
2. Loosen the door hinge installation bolts and adjust the door.
Standard clearance
a: 2.8?3.8 mm {0.12?0.14 in}
b: -1.0?1.0 mm {-0.039?0.039 in}
c: 2.5?4.5 mm {0.10?0.17 in}
d: -1.0?1.0 m ...
Brake Fluid Pressure Sensor
Purpose/Function
The brake fluid pressure sensor detects the fluid pressure from the master
cylinder and transmits it to the DSC HU/CM.
Construction
The brake fluid pressure sensor is built into the DSC HU/CM. Therefore if
there is any malfunction of the brake fluid pressur ...
