Mazda CX-5 Service & Repair Manual: Power Outer Mirror Inspection
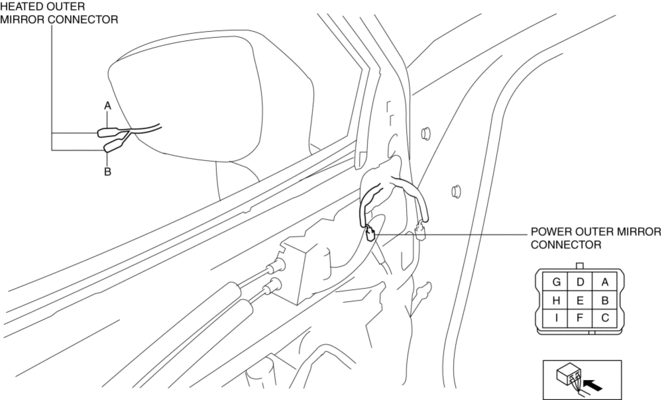
Mirror Glass Adjustment
1. Disconnect the negative battery cable..
2. Remove the following parts:
a. Inner garnish.
b. Front door trim.
c. Power outer mirror.
3. Apply battery positive voltage and connect the ground to the power outer mirror terminals and inspect the power outer mirror operation.
-
If the power outer mirror does not operate as indicated in the table, replace the power outer mirror.
|
Mirror operation direction |
Battery positive voltage connect terminal |
Ground connect terminal |
|
Up |
C |
F |
|
Down |
F |
C |
|
Left |
I |
F |
|
Right |
F |
I |
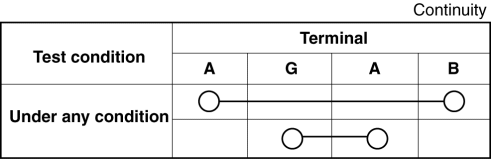
Heated Outer Mirror Inspection
1. Disconnect the negative battery cable..
2. Remove the following parts:
a. Inner garnish.
b. Front door trim.
c. Power outer mirror.
d. Outer mirror glass.
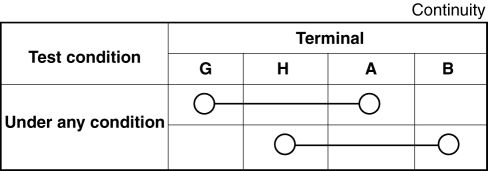
3. Verify that the continuity between heated outer mirror connector terminals is as indicated in the table.
-
If not as indicated in the table, replace the power outer mirror..
Blind Spot Monitoring (BSM) Warning Indicator Light Inspection
1. Disconnect the negative battery cable..
2. Remove the following parts:
a. Inner garnish.
b. Front door trim.
c. Power outer mirror.
d. Outer mirror glass.
3. Verify that the continuity between blind spot monitoring (BSM) warning indicator light connector terminals is as indicated in the table.
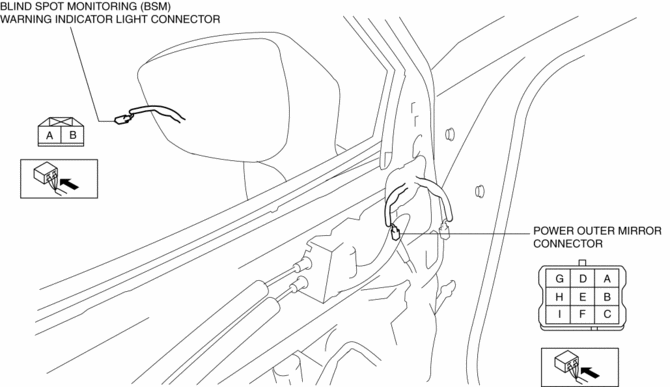
-
If not as indicated in the table, replace the power outer mirror..
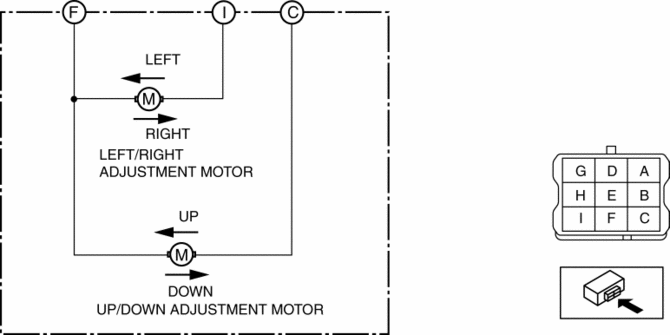
 Power Outer Mirror
Outline
The power outer mirror adjusts the outer mirror glass position up/down and
left/right using the up/down adjustment motor and, left/right adjustment motor.
The up/down adjustm ...
 Power Outer Mirror Removal/Installation
1. Disconnect the negative battery cable..
2. Remove the inner garnish..
3. Remove the front door trim..
4. Insert a tape-wrapped flathead screwdriver into the service hole and remove
hooks A ...
Other materials:
Liquid Crystal Display (LCD)
Outline
The LCD displays vehicle information in the instrument cluster.
The instrument cluster performs LCD fail-safe..
Function/Construction
The instrument cluster configures the indication of the LCD based on the
CAN signals sent from the related modules and displays ...
Front Under Cover No.1 Removal/Installation
1. Remove bolts A.
2. Remove screws B.
3. Remove fasteners C.
4. Remove the front under cover No.1 in the direction of the arrow in the order
of (1), (2) shown in the figure while detaching the guide D.
5. Install in the reverse order of removal. ...
PCM
Purpose/Function
High-level driveability and lower fuel consumption have been realized by
controlling the appropriate engine conditions (fuel injection/ignition timing)
according to operation conditions.
Controls each output part based on the signal from each input part.
...
