Mazda CX-5 Service & Repair Manual: Transfer Oil Seal Replacement [Fw6 Ax EL]
Transfer oil seal (LH)
1. Drain the transfer oil..
2. Remove the transfer from the vehicle..
3. Insert a tape-wrapped flathead screwdriver into the lip area of the oil seal (LH) as shown in the figure and remove the oil seal (LH).

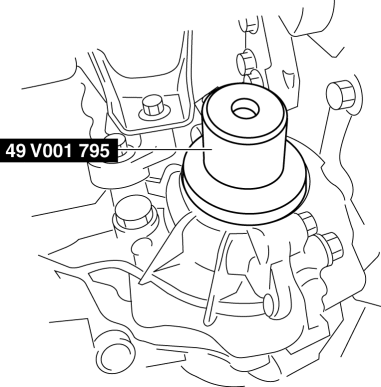
4. Using the SST
and a hammer, tap the new seal into place.

5. Apply the lip of the oil seal with transfer oil.
6. Install the transfer to the vehicle..
7. Add the specified amount and type of oil..
Transfer oil seal (RH) No.1
1. Remove the front drive shaft (RH)..
2. Insert a flathead screwdriver into the notch of the transfer and remove the oil seal (RH) No.1.

3. Using the SST
and a hammer, tap the new seal into place.
4. Coat the lip of the oil seal with transfer oil.
5. Install the front drive shaft (RH)..
Transfer oil seal (RH) No.2
1. Drain the transfer oil..
2. Remove the front drive shaft (RH)..
3. Remove the transfer oil seal (RH) No.1..
4. Insert a tape-wrapped flathead screwdriver into the lip area of the oil seal (RH) No.2 as shown in the figure and remove the oil seal (RH) No.2.

5. Using the SST
and a hammer, tap the new seal into place.

6. Apply the lip of the oil seal with transfer oil.
7. Install the transfer oil seal (RH) No.1..
8. Install the front drive shaft (RH)..
9. Add the specified amount and type of oil..
Transfer oil seal (RH) No.3
1. Drain the transfer oil..
2. Remove the front drive shaft (RH)..
3. Remove the transfer oil seal (RH) No.1..
4. Remove the oil seals using a tape-wrapped flathead screwdriver.

5. Using the SST
and a hammer, tap the new seal into place.

6. Apply the lip of the oil seal with transfer oil.
7. Install the transfer oil seal (RH) No.1..
8. Install the front drive shaft (RH)..
9. Add the specified amount and type of oil..
 Transfer Oil Replacement [Fw6 Ax EL]
1. Remove the front under cover No.2..
2. Remove the drain plug with the washer.
3. Drain the oil into a suitable container.
4. Tighten the drain plug with a new washer.
Tightening ...
 Transfer Removal/Installation [Fw6 Ax EL]
CAUTION:
Performing the following procedures without first removing the front ABS
wheel-speed sensor may possibly cause an open circuit in the harness if it is
pulled by mistake. Before ...
Other materials:
Side Wall Removal/Installation
1. Pull the side wall in the direction of the arrow in the order of (1), (2)
and remove it while detaching hooks A and clip B.
2. Pull the side wall in the direction of the arrow (3) and remove it while detaching
the guide C.
CAUTION:
If the hooks A and clip B is removed forceful ...
Rear Seat Center Armrest Removal/Installation
1. Operate the push knob (RH) and lower the rear seat back (RH).
2. Remove screw A.
3. Remove the rear seat center armrest hinge cover (RH) in the direction of the
arrow (1) shown in the figure while setting hook A aside.
4. Remove bolt B.
5. Remove the rear seat center armrest in ...
Knee Bolster Removal/Installation
1. Disconnect the negative battery cable..
2. Remove the following parts:
a. Driver-side front scuff plate.
b. Driver-side front side trim.
c. Switch panel.
d. Decoration panel.
e. Shift lever knob (MTX).
f. Front console box.
g. Shift panel.
h. Upper panel.
i. Rear console.
j. ...
