Mazda CX-5 Service & Repair Manual: Airflow Mode Actuator Inspection [Full Auto Air Conditioner]
CAUTION:
-
If the lever position exceeds the operation range shown in the figure, the circuit in the actuator could be damaged. Always perform an actuator operation inspection with the lever movement within the range shown in the figure.
1. Connect battery positive voltage to airflow mode actuator terminal D (or F), connect terminal F (or D) to ground, and then verify that the airflow mode actuator operates as shown in the table.
-
If the operation condition is not normal, replace the airflow mode actuator.
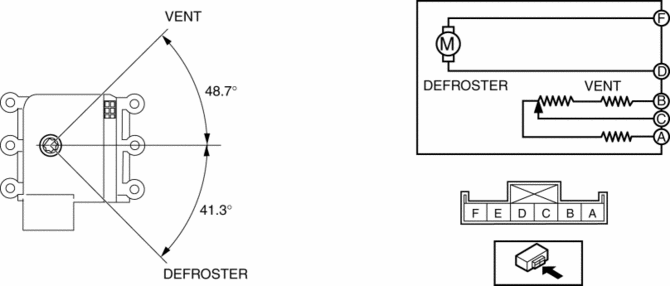
|
Terminal |
Airflow mode actuator operation |
|
|
D |
F |
|
|
B+ |
Ground |
DEFROSTER > VENT |
|
Ground |
B+ |
VENT > DEFROSTER |
2. Verify that the resistance between terminals B and C, C and A matches the airflow mode actuator operation as shown in the graph.
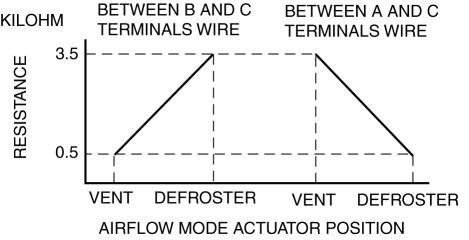
-
If the operation condition and resistance are not normal, replace the airflow mode actuator.
 Air Mix Actuator [Full Auto Air Conditioner]
Purpose
The air mix actuator moves the air mix door in the A/C unit to adjust the
temperature of the air blown from the air vent.
Function
Door open/close function
The air mix ...
 Airflow Mode Actuator Removal/Installation [Full Auto Air Conditioner]
1. Disconnect the negative battery cable..
2. Remove the following parts:
a. Dashboard under cover.
b. Glove compartment.
3. Disconnect the airflow mode actuator connector.
4. Remove the scr ...
Other materials:
Manual Transaxle Shift Mechanism Removal/Installation [C66 M R]
1. Disconnect the negative battery cable..
2. Remove the shift lever using the following procedure:
a. Remove the upper panel..
b. Remove the shift lever knob.
c. Remove the shift panel..
d. Remove the side wall..
e. Remove the rear console..
f. Press the tabs on the control cable ...
Control Valve Body [Fw6 A EL, Fw6 Ax EL]
Purpose/Function
A direct linear solenoid has been adopted for the solenoid valve which contributes
to improved shift response, drive feel and reduced shift shock by the improved
precision of the hydraulic pressure control.
Construction
The control valve body consists of in ...
Front Side Frame Installation [Panel Replacement]
Symbol Mark
Installation Procedure
1. When installing new parts, measure and adjust the body as necessary to conform
with standard dimensions.
2. Drill holes for the plug welding before installing the new parts.
3. After temporarily installing new parts, make sure the related parts fit p ...
