Mazda CX-5 Service & Repair Manual: Discharge Headlight Control Module Removal/Installation
WARNING:
-
Incorrect servicing of the discharge headlights could result in electrical shock. Before servicing the discharge headlights, always refer to the service warnings..
1. Disconnect the negative battery cable..
2. Remove the front bumper..
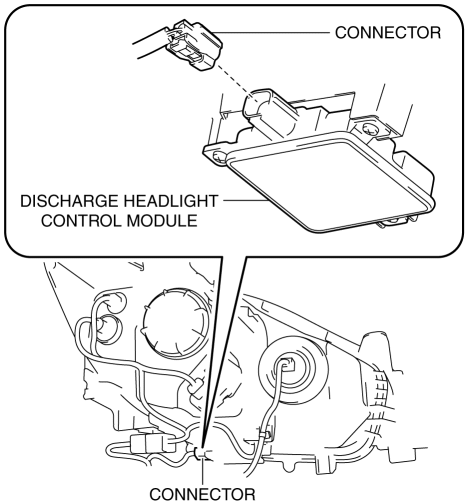
3. Disconnect the connector.
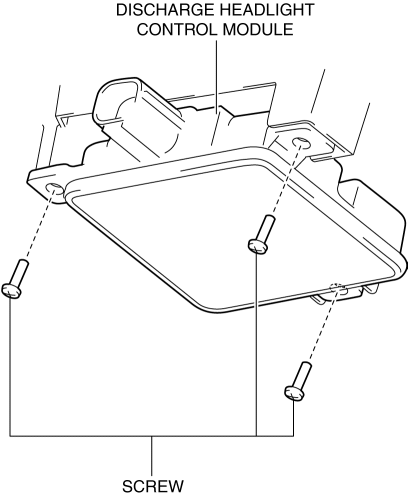
4. Remove the screws.
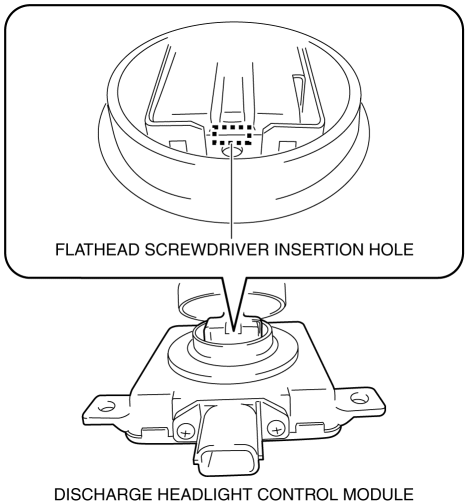
5. Insert a tape-wrapped flathead screwdriver into the clearance between the discharge headlight control module and connector shown in the figure.
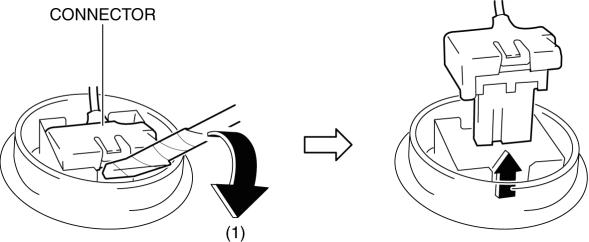
6. Move the flathead screwdriver in the direction of the arrow (1) shown in the figure, lift up the connector, and disconnect it.
7. Remove the seal.
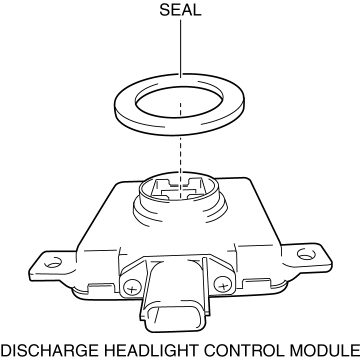
8. Remove the discharge headlight control module.
9. Install in the reverse order of removal.
 Discharge Headlight Control Module
Purpose
Converts DC voltage from the battery to AC voltage and outputs the stabilized
voltage to the discharge headlight.
Function
The discharge headlight control module control ...
 Discharge Headlight Service Warnings
Discharge Headlight Service Warnings
When replacing a discharge headlight bulb, performing the servicing with
the negative battery cable connected or in a wet work area could result in elect ...
Other materials:
Antenna Feeder No.3 Inspection
1. Disconnect the negative battery cable..
2. Remove the following parts:
a. Front scuff plate.
b. Rear scuff plate.
c. B-pillar lower trim.
d. Front seat belt adjusting cover.
e. Front seat belt upper anchor installation bolt.
f. B-pillar upper trim.
g. Rear seat cushion.
h. Trunk ...
Shroud Side Member Installation [Panel Replacement]
Symbol Mark
Installation Procedure
1. When installing new parts, measure and adjust the body as necessary to conform
with standard dimensions.
2. Drill holes for the plug welding before installing the new parts.
3. After temporarily installing new parts, make sure the related parts fit p ...
Rear Door Speaker Inspection
1. Disconnect the negative battery cable..
2. Remove the rear door trim..
3. Disconnect the rear door speaker connector..
4. Verify that the resistance between the rear door speaker terminals is as indicated
in the table.
If not as indicated in the table, replace the rear door sp ...
