Mazda CX-5 Service & Repair Manual: Power Outer Mirror Inspection
Mirror Glass Adjustment
1. Disconnect the negative battery cable..
2. Remove the following parts:
a. Inner garnish.
b. Front door trim.
c. Power outer mirror.
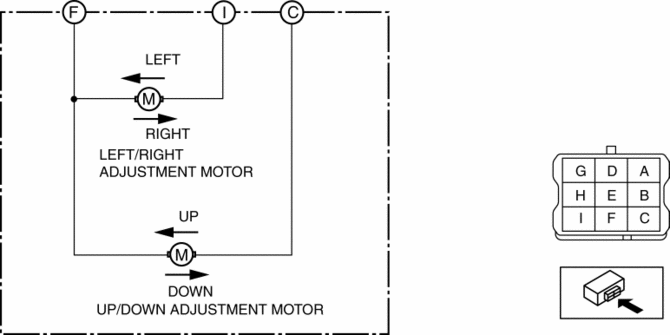
3. Apply battery positive voltage and connect the ground to the power outer mirror terminals and inspect the power outer mirror operation.
-
If the power outer mirror does not operate as indicated in the table, replace the power outer mirror.
|
Mirror operation direction |
Battery positive voltage connect terminal |
Ground connect terminal |
|
Up |
C |
F |
|
Down |
F |
C |
|
Left |
I |
F |
|
Right |
F |
I |
Heated Outer Mirror Inspection
1. Disconnect the negative battery cable..
2. Remove the following parts:
a. Inner garnish.
b. Front door trim.
c. Power outer mirror.
d. Outer mirror glass.
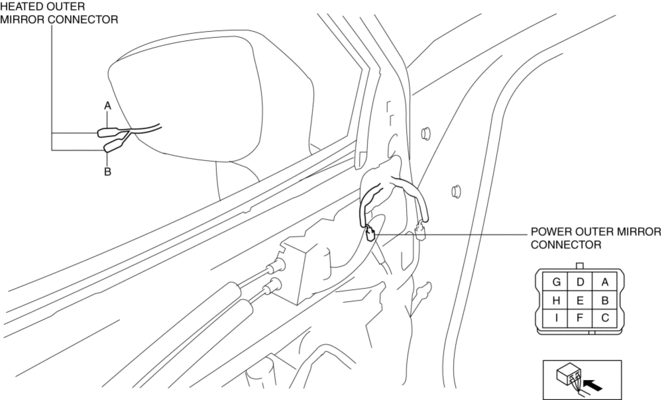
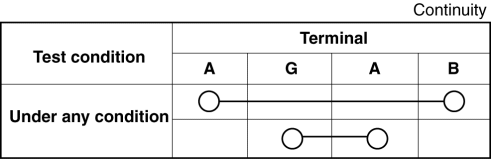
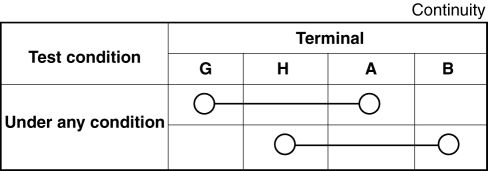
3. Verify that the continuity between heated outer mirror connector terminals is as indicated in the table.
-
If not as indicated in the table, replace the power outer mirror..
Blind Spot Monitoring (BSM) Warning Indicator Light Inspection
1. Disconnect the negative battery cable..
2. Remove the following parts:
a. Inner garnish.
b. Front door trim.
c. Power outer mirror.
d. Outer mirror glass.
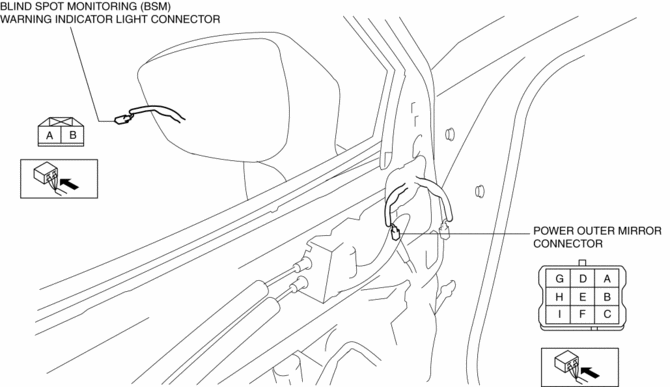
3. Verify that the continuity between blind spot monitoring (BSM) warning indicator light connector terminals is as indicated in the table.
-
If not as indicated in the table, replace the power outer mirror..
 Power Outer Mirror
Outline
The power outer mirror adjusts the outer mirror glass position up/down and
left/right using the up/down adjustment motor and, left/right adjustment motor.
The up/down adjustm ...
 Power Outer Mirror Removal/Installation
1. Disconnect the negative battery cable..
2. Remove the inner garnish..
3. Remove the front door trim..
4. Insert a tape-wrapped flathead screwdriver into the service hole and remove
hooks A ...
Other materials:
Front Bumper Disassembly/Assembly
1. Disassemble in the order indicated in the table.
1
Rivet
2
Grille bracket
3
Front bumper retainer
4
Screw
5
Radiator grille
6
O ...
On Board Diagnostic System PID/Data Monitor Inspection [Fw6 A EL, Fw6 Ax EL]
1. Connect the M-MDS to the DLC-2.
2. After the vehicle is identified, select the following items from the initialization
screen of the M-MDS.
a. Select “DataLogger”.
b. Select “Modules”.
c. Select “TCM”.
3. Select the applicable PID from the PID table.
4. Verify the PID da ...
Rear Seat Cushion Removal/Installation
CAUTION:
When removing or putting in the rear seat cushion, contact with the surrounding
areas of the vehicle could cause scratches and damage. When removing or putting
in the rear seat cushion, always use two or more persons to perform the work
and be careful not to scratch or dama ...
