
Mazda CX-5 Service & Repair Manual: Camshaft Position (CMP) Sensor Removal/Installation
CAUTION:
-
When replacing the CMP sensor, make sure there is no foreign material on it such as metal shavings. If it is installed with foreign material, the sensor output signal will malfunction resulting from fluctuation in magnetic flux and cause a deterioration in engine control.
Intake CMP Sensor
1. Disconnect the negative battery cable..
2. Remove the plug hole plate..
3. Remove the intake manifold..
4. Disconnect the intake CMP sensor connector.
5. Remove the intake CMP sensor.
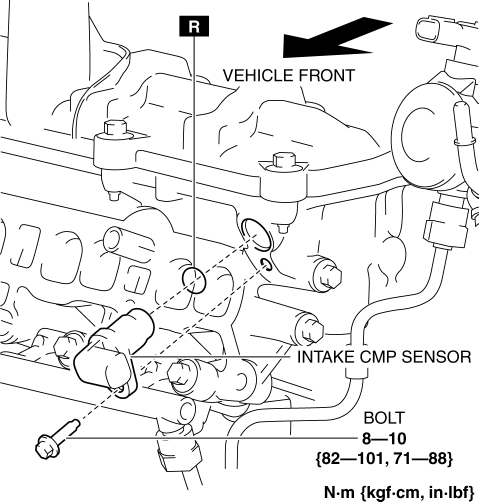
6. Install in the reverse order of removal.
Exhaust CMP Sensor
1. Disconnect the negative battery cable..
2. Remove the plug hole plate..
3. Disconnect the exhaust CMP sensor connector.
4. Remove the exhaust CMP sensor.

5. Install in the reverse order of removal.
 Camshaft Position (CMP) Sensor Inspection
Intake CMP Sensor
Visual inspection
CAUTION:
When replacing the CMP sensor, make sure there is no foreign material on
it such as metal shavings. If it is installed with foreign material, ...
 Camshaft Position (CMP) Sensor
Purpose/Function
Detects the camshaft speed as basic information for mainly determining the
fuel injection timing and ignition timing.
Detects the camshaft speed and inputs it to the ...
Other materials:
Money-Saving Suggestions
How you operate your Mazda determines how far it will travel on a tank of fuel.
Use these suggestions to help save money on fuel and repairs.
• Avoid long warm-ups. Once the engine
runs smoothly, begin driving.
• Avoid fast starts.
• Keep the engine tuned. Follow the maintenance
sched ...
Power Flow [Fw6 A EL, Fw6 Ax EL]
Power flow
1 GR
2 GR
3 GR
4 GR
5 GR
6 GR
REVERSE
...
Rear Door Trim Disassembly/Assembly
1. Disassemble in the order shown in the figure.
1
Switch panel cover
2
Power window subswitch.
3
Fastener
4
Rear door trim
2. Assemble in the reverse order of disassembly.
...
