Mazda CX-5 Service & Repair Manual: Discharge Headlight Bulb
Purpose, Function
-
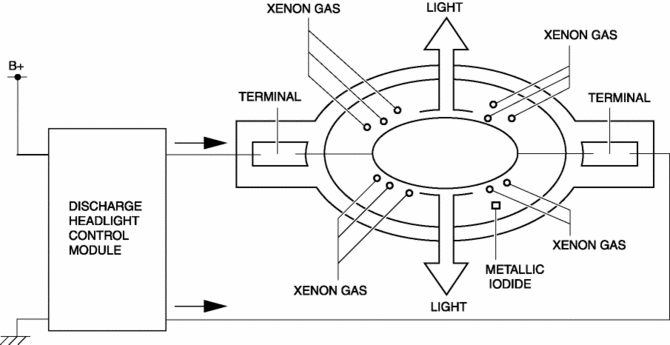
Charges the internal metallic element and emits white light resembling sunlight.
Construction
-
A mercury-free bulb has been adopted for the discharge headlight bulb.
-
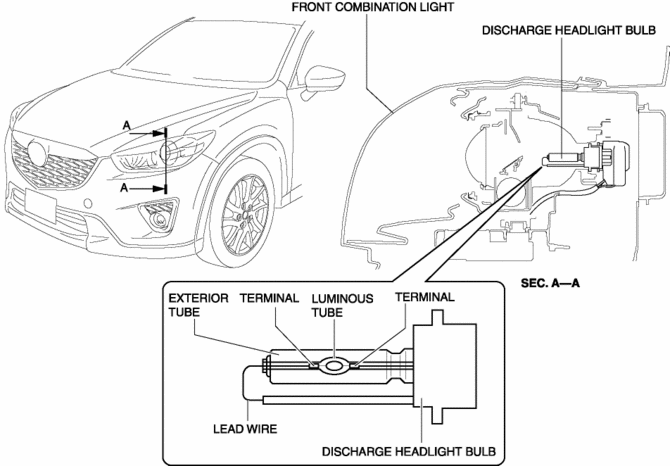
The discharge headlight bulb is assembled to the front combination light.
-
The discharge headlight bulb consists of xenon gas, a luminous tube in which metallic iodide is enclosed, a lead wire and electrodes which pass electricity, and an exterior tube.
Operation
1. When high DC voltage (approx. 25,000 V) from the discharge headlight control module is input to the electrodes, the insulation between the electrodes is broken down and electrical current flows between the electrodes.
2. When electrical current flows between the electrodes of the discharge headlight bulb, the xenon gas is energized and emits light.
3. When the xenon gas emits light, temperature inside the discharge headlight bulb rises, the metallic iodide vaporizes/separates, and the metallic element discharges and emits light.
Fail-safe
-
Function not equipped.
 DRL (Daytime Running Light) System
Outline
The DRL system automatically switches the headlights to HI beams (50% dim)
or illuminates the DRL bulb when the ignition is switched ON (engine on), the
parking brake is released, ...
 Discharge Headlight Control Module
Purpose
Converts DC voltage from the battery to AC voltage and outputs the stabilized
voltage to the discharge headlight.
Function
The discharge headlight control module control ...
Other materials:
Oil Seal (Differential) Replacement [Fw6 A EL, Fw6 Ax EL]
Transaxle Case Side
1. Remove the front under cover No.2..
2. Drain the ATF..
3. Disconnect the drive shaft (LH) from the transaxle..
CAUTION:
The oil seal is easily damaged by the sharp edges of the drive shaft splines.
Do not let the splines contact the oil seal.
4. Remove ...
Auto Leveling Sensor Removal/Installation
1. Disconnect the negative battery cable..
2. Disconnect the connector.
3. Remove the bolts.
4. Remove the auto leveling sensor.
5. Install in the reverse order of removal.
6. Perform the auto leveling system initial setting.. ...
Rear Seat Back Frame Removal/Installation
CAUTION:
When performing the procedure with a rear seat removed from the vehicle,
perform the procedure on a clean cloth so as not to damage or soil the seat.
6:4 Split Type
1. Remove the trunk board..
2. Remove the rear seat back..
3. Remove the headrest.
4. Open fasteners A ...
