Mazda CX-5 Service & Repair Manual: Liftgate Hinge Removal/Installation
1. Disconnect the negative battery cable..
2. Remove the following parts:
a. Rear scuff plate.
b. Trunk end trim.
c. Trunk side trim.
d. C-pillar trim.
e. D-pillar trim.
f. Liftgate.
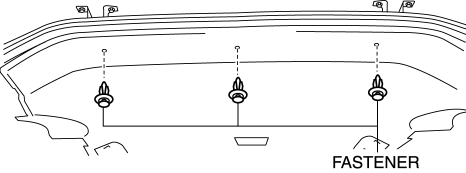
3. Remove fasteners.
4. While partially peeling back the rear part of the headliner, remove nuts.
CAUTION:
-
Peeling back the headliner without supporting it may cause the headliner to bend excessively and create a fold seam. Peel back the headliner while supporting it.
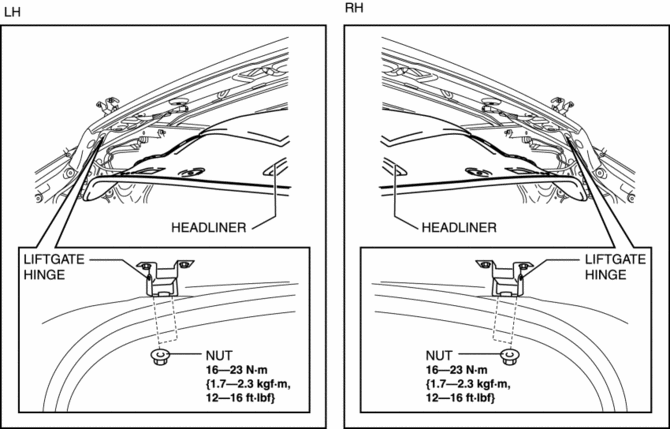
5. Remove the liftgate hinges.
6. Install in the reverse order of removal.
 Liftgate Garnish Removal/Installation
1. Disconnect the negative battery cable..
2. Remove the following parts:
a. Liftgate upper trim.
b. Liftgate side trim.
c. Liftgate recess.
d. Liftgate lower trim.
3. Disconnect the conne ...
 Liftgate Latch And Lock Actuator Inspection
The following actuator and switch are integrated with the liftgate latch
and lock actuator.
From the actuator/switch name and operation in the following table, select
the actua ...
Other materials:
Front Door Trim Disassembly/Assembly
Driver-side
1. Disassemble in the order shown in the figure.
1
Switch panel cover
2
Power window main switch
(See Power Window Main Switch, Power Window Subswitch And Lock Switch
Removal Note.)
3
Fastener
...
Air Bag Module And Pre Tensioner Seat Belt Disposal Procedures [Standard Deployment
Control System]
WARNING:
A live (undeployed) air bag module or pre-tensioner seat belt may accidentally
operate (deploy) when it is disposed of and cause serious injury. Always refer
to the “AIR BAG MODULE AND PRE-TENSIONER SEAT BELT DEPLOYMENT PROCEDURES”
and dispose of air bag modules a ...
Differential [C66 M R]
Purpose, Function
The differential absorbs the rotation speed of the inside and outside wheel
of a wheel set when the vehicle is cornering.
Construction
Operation
Driving in a straight line
Cornering
...
