Mazda CX-5 Service & Repair Manual: Precaution
Intermittent Concern Troubleshooting
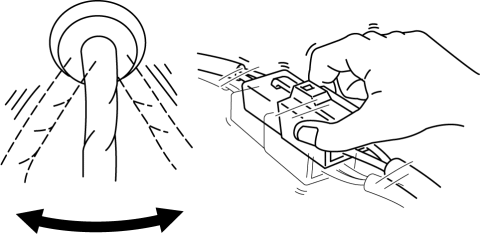
Vibration method
-
If a malfunction occurs or becomes worse while driving on a rough road or when the engine is vibrating, perform the following steps.
NOTE:
-
There are several reasons why vehicle or engine vibration could cause an electrical malfunction. Inspect the following:
-
Connectors not fully seated.
-
Wiring harnesses not having full play.
-
Wires laying across brackets or moving parts.
-
Wires routed too close to hot parts.
-
An improperly routed, improperly clamped, or loose wiring harness can cause wiring to become pinched between parts.
-
The connector joints, points of vibration, and places where wiring harness pass through the firewall, body panels and other panels are the major areas to be inspected.
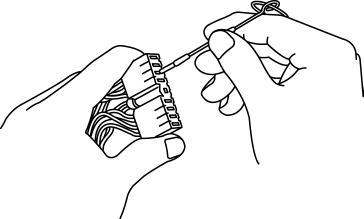
Inspection method for switch and/or sensor connectors or wires
1. Connect the M-MDS to the DLC-2.
2. Turn the ignition switch to the ON position (engine off).
NOTE:
-
If the engine starts and runs, perform the following steps at idle.
3. Access PIDs for the switch you are inspecting.
4. Turn the switch on manually.
5. Slightly shake each connector or wiring harness vertically and horizontally while monitoring the PID.
-
If the PID value is unstable, inspect for poor connection.
Inspection method for sensors
1. Connect the M-MDS to the DLC-2.
2. Turn the ignition switch to the ON position (engine off).
NOTE:
-
If the engine starts and runs, perform the following steps at idle.
3. Access PIDs for the switch you are inspecting.
4. Vibrate the sensor slightly with your finger.
-
If the PID value is unstable or a malfunction occurs, inspect for poor connection and/or poorly mounted sensor.
Connector terminal inspection method
1. Inspect the connection of each female terminal.
2. Insert the male terminal to the female terminal and inspect the female terminal for looseness.
 General Procedures (Steering)
WARNING:
Always inspect the steering component carefully for any shock or impact which
may have occurred during a collision or servicing operation. If a damaged part
or a part suspected ...
 Steering Abbreviations
AAS
Active Adaptive Shift
ABS
Antilock Brake System
ABDC
After Bottom Dead Center
ACC
Access ...
Other materials:
Shift Solenoid No.1 [Fw6 A EL, Fw6 Ax EL]
Purpose/Function
Shift solenoid No.1 adjusts the hydraulic pressure in the low clutch circuit
based on the current demand from the TCM according to the vehicle conditions.
Construction
Shift solenoid No.1 is installed to the solenoid control valve body.
Shift solenoid ...
Automatic Transaxle Outline [Fw6 A EL, Fw6 Ax EL]
Outline
Contribution to low fuel economy
Wide TCC range
Clutch/brake resistance reduction
Realized direct feel and quick shifting
Oil passage resistance reduction and improved clutch/brake response
b ...
Liftgate Latch And Lock Actuator Inspection
The following actuator and switch are integrated with the liftgate latch
and lock actuator.
From the actuator/switch name and operation in the following table, select
the actuator or switch to be inspected, and perform the inspection following
the inspection procedure desc ...
