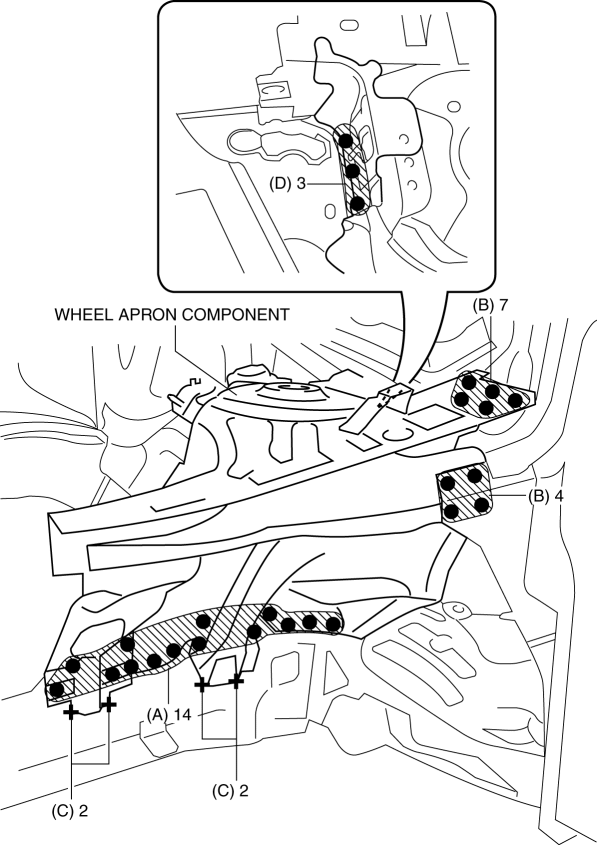
Mazda CX-5 Service & Repair Manual: Wheel Apron Component Removal [Panel Replacement]
Symbol Mark

Removal Procedure
1. Drill the 14 locations indicated by (A) from the front wheel housing side shown in the figure.
2. Drill the 11 locations indicated by (B) shown in the figure.
3. Drill the 4 locations indicated by (C) shown in the figure.
NOTE:
-
When drilling the 14 locations indicated by (A) and 4 locations indicated by (C) shown in the figure, do not drill a hole all the way through or there could be a problem when installing the new part.
4. Drill the 3 locations indicated by (D) shown in the figure.
5. Drill the 12 locations indicated by (E) from the inside shown in the figure.
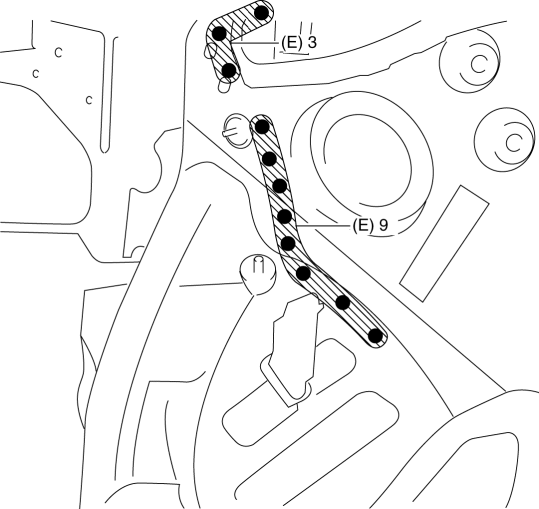
6. Remove the wheel apron component.
 Wheel Apron Component Installation [Panel Replacement]
Symbol Mark
Installation Procedure
1. When installing new parts, measure and adjust the body as necessary to conform
with standard dimensions.
2. Drill holes for the plug welding before inst ...
 Wheel Balance Adjustment (Aluminum Alloy Wheel)
CAUTION:
Adjust the outer wheel balance first, then the inner wheel balance.
Be careful not to scratch the wheels.
Adhesive-type Balance Weight (Outer)
1. Remove the old bal ...
Other materials:
Jacking Positions, Vehicle Lift (2 Supports) And Safety Stand (Rigid Rack) Positions
Jacking Positions
WARNING:
Improperly jacking a vehicle is dangerous. The vehicle can slip off the jack
and cause serious injury. Use only the correct front and rear jacking points
and block the wheels.
CAUTION:
Use safety stands to support the vehicle after it has been ...
Clock Spring Inspection [Standard Deployment Control System]
1. Disconnect the negative battery cable and wait for 1 min or more..
2. Remove the driver?side air bag module..
3. Remove the steering wheel..
4. Remove the column cover..
5. Remove the clock spring..
6. Verify that the continuity is as indicated in the table.
If not as indicated ...
Wheel Hub Component Removal/Installation [Awd]
CAUTION:
Performing the following procedures without first removing the ABS wheel-speed
sensor may possibly cause an open circuit in the wiring harness if it is pulled
by mistake. Before performing the following procedures, disconnect the ABS wheel-speed
sensor connector (body side) ...
